Saturday Set Up – Sharp Definition
This lighting set up achieves sharp light and shade contrasts with a dark background, helping the subject really ‘pop’.
1. Beauty Dish as key light – (Yes I love beauty dishes)! Placed almost completely to the side of Lara our model, you can see how it’s creating a lovely light on one side of her face, and throwing deliciously deep shadows on the opposite side of her nose and face. I love these sharp contours that accentuate Lara’s face, and help bring out the depth of shimmer in the make up and jewellery.
2. Small snoot as hair light – since we had jewels in Lara’s hair, a small snoot sitting behind her at a lower output than the key light helped provide a glint in the hair accessories. Without this light, the accessories looked a little flat.
3. Camera settings – Shutter speed 1/125, aperture f5.6, ISO 100.
Happy lighting!
The ‘CV’ for Creatives
CV? For a creative? Isn’t that just my portfolio? NO. So many times, I see photographers/MUAs/Models in the industry who think a link to their online portfolio or a business card/zcard is CV enough.
Coming from a corporate background, I know the strength and importance of a CV when it comes to resourcing projects, so why as creatives do we neglect this part of our self promotion? Above is my bio, or CV of types – it’s not a traditional corporate one – well we are creatives after all! The structure of the bio can be applied to models, make up artists and designers alike. Hope it helps you think about your positioning.
Structuring a creative bio:
1. Blurb about yourself – things like where you are based, and why you are in your particular creative field.
2. Your history – what journey have you taken to get to where you are today – not life stories, but interesting facts and insights into you as a person.
3. What make you different? – something about your style or unique differentiator that sets you apart from the rest.
4. Your published/client history – credentials are important to potential clients, and seeing which other companies or creatives have put their faith in you gives them the confidence to hire you.
5. Your contact details – well duh.
6. Visuals of your work – we are creatives, so design a bio with visuals of your work that show off your work, your style, and your personality!
Happy promoting!
Saturday Set Up – Clean Beauty
This lighting set up is a common one I use for clean beauty shots against a light backdrop.
1. Large Softbox on background – for a pure white background with minimal retouch in post processing, set this light head to a higher output than your key and fill lights. I like the spill back from this light on Laura Ann’s neck, but to avoid such light spilling back, place the model further forward, closer to the camera and further from this light.
2. Beauty Dish as key light – Beauty dishes seem to be like Marmite in the photography industry, and I’m one of those who love them! I like the soft even light they give, and in cases where the model has her eyes open, I quite like the round catch lights they create in the eyes.
3. Small Softbox as fill light – I prefer some shadows in beauty imagery, and not totally even, clean, bright (and in my opinion a little boring) light. So for a fill light, I’ll use a small softbox, further away from the model, and at a lower output than the key light. Here it helps cast evenness to the main part of her face, but enables depth on the cheeks, and definition to the jawline.
4. Camera settings – Shutter speed 1/160, aperture f5.6, ISO 100.
More lighting set ups to follow each Saturday for the next few weeks. Hope that’s useful to a few folks 🙂
Having an Epiphanie
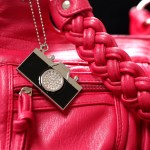
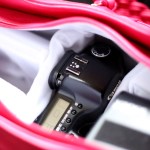
My new Epiphanie Stella bag arrived today – and I’m freakin’ loving it! What’s not to love? Lush pink colour – check. Ample camera equipment room – check. Looks like a gorgeous designer bag – check. Cute metallic and diamante camera charm – check. AND IT’S PINK!
Ok, so after a few deep breaths, I collected myself again, and have taken some shots of it to show you the quality and detailing. It holds an SLR body, and has room for up to 6 six medium sized lenses / flash guns. With 2 front pockets, 2 side pockets, and a back pocket, there is plenty of space for batteries, smartphone, business cards, ipad mini etc.
I’m glad there are products geared directly towards the female photographer market, and this is definitely worth the investment. My only critique would be the white interior (I know I’m gonna get that grubby!), and I’d have preferred black or a deep grey, but hey – did I tell you how gorgeous it looks AND IT’S PINK?
You can grab yourself a Stella too from Epiphanie.
In a Haze – Atomic Tips
I get asked a lot ‘how do you get that hazy summer look to images?’… Here’s how to without post processing:
1. Forget all the usual rules about the light facing your subject.
2. Check when the sun is rising or going down – and get yourself out around 40 mins before that time.
3. Place your subject between the sun rise / sunset and yourself, with the sun behind the subject.
4. Play around with your settings to achieve the type of haze you want – the above image was taken around 20 mins before sunset in Paris, with a shutter speed of 1/125, and f5.0 and no flash. You could use flash to achieve a more halo effect around the subject, or increase your ISO to create a bright ethereal effect.
5. Have fun breaking the rules! Shoot using the settings YOU like the results from 🙂
Happy shooting!
Memory Lane…
I’ve not been getting much of a chance to log on to Second Life lately, let alone create any goodies on there… I came across this image from a feature of my work in Radar Magazine (skin, dress, and hairpiece all from Verve by AtomicSparkle Skytower)- and I’m almost tempted to shift my timetable and get creating again…. Skin or clothes?….
The Ink Evangelist
Just a few weeks ago I discovered one of the most beautiful books I’ve ever seen, and thus began my journey of inspiration, admiration, and colouring in. Yes. Colouring in.
‘Secret Garden, An Inky Treasure Hunt’ by Johanna Basford is a grown up colouring book of exquisite ink designs. Combining nature, with Asian art elements, all with a feel of the ornate Victorian era too, Johanna creates the most delicious imagery that captivates the audience. So much so, my mum totally coveted my copy and I had to go buy some more!
Intrigued by the book, I was even more blown away by Johanna’s portfolio and the clients she’s worked for, from fashion imagery, to music album artwork, to major ad campaigns. Ok enough gushing, take a look at her amazing work, and indulge the artist in you by getting your own copy of Secret Garden.
No light meter? No problem! – Atomic Tips
None of us like to carry lots of gear, so if you don’t have a light meter handy, fear not! It’s likely you can use your camera’s auto mode to gather a basic idea of the settings you need for a decent exposure. Take a shot in auto mode, and hit info to gather the shutter speed, ISO and aperture settings. Copy the settings into manual mode, and using the light metering indication (usually looks like the diagram below):
You can then shift individual elements like shutter speed, sensitivity, aperture etc. to get the aesthetic results you are after – negative on the exposure scale will yield darker moodier images, and positive on the scale will create brighter, lighter images.
Once you get a feel for your camera settings, and practice enough, you’ll start to be able to ‘read’ the light in your scene and will come to know which settings work for which types of end results.
Happy snapping!


