atomic tips

Atomic GPS – Paris Locations

Many photographers don’t share their photo-shoot locations, but I’m really happy to – and after a few trips last year, many people have asked me the best places to shoot on location.  So in my Atomic GPS series, I’m going to share my shoot locations, image by image for you all.


IMG_8074-Edit

Eiffel Tower


IMG_7747

Pont de l’Archevêché – The Lock Bridge


IMG_7777

Notre Dame


IMG_7863

Pont Neuf


IMG_8431

Hotel De Ville


IMG_8855

Place De La Concorde


IMG_8874

Arc De Triomphe


IMG_8939

Eiffel Tower


IMG_8775-Edit

Louvre Palace

Atomic Tips – Lightroom Colour Boosting

There’s an easy way to create va va voom in your images through boosting colour – but I’m not talking about flat upping the saturating here…  This tutorial shows you how to boost individual colour groups without tinting the entire image in Adobe Lightroom.

Here is my original image from a recent holiday to Venice with my daughter:

Before

It’s a decent image, but I know from memory, her dress was redder, the water was even more turquoise, and the buildings were a more fiery orange and red.  Now I want to up the colours, but I don’t want to unbalance my daughter’s skin tones, or cause image degradation through a broad brush saturation increase.

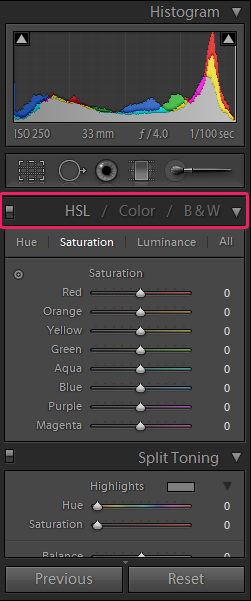
The place to boost individual colour groups, is in the Develop > HSL (Hue Saturation Luminance) > Saturation control panel.

Develop:

Lightroom Menu

HSL:

HSL Menu

Saturation:

Saturation Menu

As you can see above, we can now boost the saturation of individual colours in the image, and I’ve upped my reds, blues, aqua, orange, and brought down the green a little.  Have a play around with the sliders to achieve the level of boldness you desire.

The Hue mode allows you to alter the hue/shade of the colours, and the Luminance mode allows you to control the lightness or darkness of certain colours.

Finally, I did also do a +9 on overall saturation too to give the following result:

After

Have fun colour boosting!

Saturday Set Up – Shimmer Me Up

SetUp Polish

I’m a sucker for glowy skin, and this set up is how I get it – working in conjunction with my make up artist (see below).

1. Large Softbox on background – to blow out the background, set this light head to a higher output than your key light.

2. Small Softbox as key light – To get shiny highlights on the cheek bone, jaw, shoulder and nose, place the key light close to the model, at a lower output to the background light to keep that background pure white!  At this point, I usually take a test shot, and ask the make up artist in the team to add more shimmer or highlight to the parts of the model I really want to shine.  It’s super important to collaborate closely with the make up artist even while shooting.

4. Camera settings – Shutter speed 1/160, aperture f5.6, ISO 100.

Saturday Set Up – Moody

SetUp Gwen

One of the easiest lighting set ups with the most dramatic and moody effects.

1. Large softbox as key light – Placed very close to the side of our model, you can see how the large softbox is throwing a soft even light on one side of her face shoulders and arm, and creates hard deep shadows on the other side.  Deep dark shadows create drama and contrast, and help create an alluring effect.  Note: the closer the light to the model, the sharper the shadows.

2. Camera settings – Shutter speed 1/160, aperture f5.6, ISO 100.

Happy lighting!

Lowest Common Denominator – Atomic Tips

Q:  What makes a great image?
A gorgeous model?  An awesome make up artist?  An uber stylist?  A great photographer/retoucher?
A:  All of the above.  Images are only as good as the lowest common denominator in the creative team – and I really swear by this.
IMG_4394-Edita
Most of my facebook feed is full of creatives, and I see imagery of varying quality – which is understandable of course.  My early days imagery I wish I could erase now, but it’s there for posterity, and is a mark of the journey I continue to make to improve my work.
But recently I’ve seen people rant about amateur creatives be they photographers or models or makeup artists, and how someone or other let them down…
There are 3 key things I do in order to select creatives for future commissions:
1.  Review their portfolio – online, tear sheets…  Little alarm bells ring in my head if people can only provide links to facebook pictures.  I look for well presented portfolios, and their profiles on industry networking sites.
2.  Meet the person – nothing beats meeting someone face to face to see what motivates them, and stimulates them creatively.  It’s really important to have elements in common, yet I’m also looking to be inspired and learn from colleagues in the industry.
3.  Testing – proof of the pudding is in the eating!  Collaborate on a test shoot to really build relationships and find out if you’re on the same wavelength and gel together creatively.
If you don’t invest time to select the right people to work with, you’re just gambling on quality of results.  I’m not much of gambler…

Saturday Set Up – Sharp Definition

SetUp Lara

This lighting set up achieves sharp light and shade contrasts with a dark background, helping the subject really ‘pop’.

1. Beauty Dish as key light – (Yes I love beauty dishes)!  Placed almost completely to the side of Lara our model, you can see how it’s creating a lovely light on one side of her face, and throwing deliciously deep shadows on the opposite side of her nose and face.  I love these sharp contours that accentuate Lara’s face, and help bring out the depth of shimmer in the make up and jewellery.

2. Small snoot as hair light – since we had jewels in Lara’s hair, a small snoot sitting behind her at a lower output than the key light helped provide a glint in the hair accessories.  Without this light, the accessories looked a little flat.

3. Camera settings – Shutter speed 1/125, aperture f5.6, ISO 100.

Happy lighting!

Saturday Set Up – Clean Beauty

SetUp LalaAnn

This lighting set up is a common one I use for clean beauty shots against a light backdrop.

1. Large Softbox on background – for a pure white background with minimal retouch in post processing, set this light head to a higher output than your key and fill lights.  I like the spill back from this light on Laura Ann’s neck, but to avoid such light spilling back, place the model further forward, closer to the camera and further from this light.

2. Beauty Dish as key light – Beauty dishes seem to be like Marmite in the photography industry, and I’m one of those who love them!  I like the soft even light they give, and in cases where the model has her eyes open, I quite like the round catch lights they create in the eyes.

3. Small Softbox as fill light – I prefer some shadows in beauty imagery, and not totally even, clean, bright (and in my opinion a little boring) light.  So for a fill light, I’ll use a small softbox, further away from the model, and at a lower output than the key light.  Here it helps cast evenness to the main part of her face, but enables depth on the cheeks, and definition to the jawline.

4. Camera settings – Shutter speed 1/160, aperture f5.6, ISO 100.

More lighting set ups to follow each Saturday for the next few weeks.  Hope that’s useful to a few folks 🙂

No light meter? No problem! – Atomic Tips

None of us like to carry lots of gear, so if you don’t have a light meter handy, fear not!  It’s likely you can use your camera’s auto mode to gather a basic idea of the settings you need for a decent exposure.  Take a shot in auto mode, and hit info to gather the shutter speed, ISO and aperture settings.  Copy the settings into manual mode, and using the light metering indication (usually looks like the diagram below):

metering

You can then shift individual elements like shutter speed, sensitivity, aperture etc. to get the aesthetic results you are after – negative on the exposure scale will yield darker moodier images, and positive on the scale will create brighter, lighter images.

Once you get a feel for your camera settings, and practice enough, you’ll start to be able to ‘read’ the light in your scene and will come to know which settings work for which types of end results.

Happy snapping!